
How to present a jewellery stand at a market or trade fair
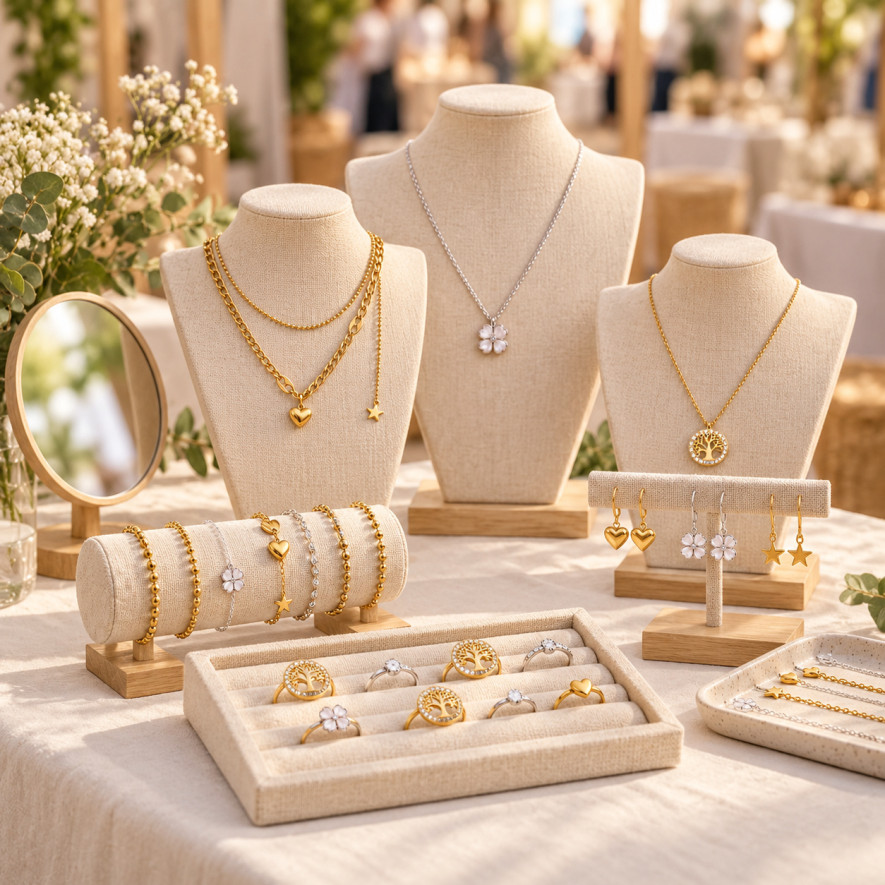
Prepare a clear, workable jewellery stand for a market or fair: product arrangement, supports, prices, lighting and a service area.
A jewellery stand should make your offer understandable within a few seconds and let visitors examine the pieces confidently. Decoration attracts attention, but product visibility, prices and a comfortable viewing experience matter just as much. Someone who cannot distinguish the categories or worries about knocking over a display may walk past even when the jewellery suits their taste.
When preparing for a market, fair or temporary sale, start with the space actually available and the journey of a person who stops. This guide offers a presentation method, an example layout and practical ideas to adapt to your collection. It does not promise sales: location, footfall, assortment and the conditions of the event also influence results. A workable stand supports the visitor’s experience and your own organisation throughout the day.
Plan the stand before packing the boxes
Establish the constraints of the space
Ask for the table dimensions, permitted depth and equipment provided. Check whether people can approach from the front or several sides. A table against a wall needs a different arrangement from an island. Identify features you cannot change, including pillars, walkways, power points and neighbouring stands. Your plan should work in this particular setting, with enough room for people to look without reaching awkwardly over the display.
Read the organiser’s requirements for installations, furniture stability and electrical equipment. Outdoors, anticipate wind, rain and sun exposure. Supports must remain stable when someone touches a piece. Avoid unnecessary height and objects extending into the walkway. A suitable setup makes your work easier and helps event staff manage the space. Check the actual equipment rather than assuming that a previous market’s conditions apply to the next one.
Plan transport and assembly
Pack in installation order: table covering, supports, jewellery, signs, then sales equipment. A photograph of a trial setup at home helps you recreate it quickly. Number the boxes if useful and keep a small kit containing suitable fasteners, a cloth, appropriate tape and spare components. This reduces rushed handling at the start of the day. Keep fragile decorative surfaces protected while moving the boxes and avoid loose chains sharing a compartment.
Select an assortment rather than displaying all stock
Choose references that represent your offer and keep replenishment stock out of sight. A collection need not be shown in full to be understood. Start with coherent groups: understated pieces, motifs, more prominent designs and gift ideas. The right quantity depends on surface area and support size, rather than a universal number. Leave enough space to identify individual models and retrieve them without disturbing neighbouring pieces or their labels.
Organise three clear areas
An attention area visible from the walkway
Show a small, readable selection at first glance: a distinctive necklace, textured earrings or a colour combination. This area introduces your style and should not become a pile of competing designs. Leave space around the main piece so its silhouette is visible from a few steps away. Test the view from the direction visitors will actually approach rather than judging the arrangement only from behind the table.
A discovery area for comparison
Group jewellery that answers a similar need. You can display bracelets together or create visual groups by style, provided categories remain identifiable. Explain when pieces shown together are sold separately. A composition on a bust should not suggest that one price includes every accessory if that is not the offer. Keep references easy to trace so you can answer questions and locate the matching stock without searching through several boxes.
A service area that stays available
Reserve space to place a model, provide a mirror, prepare packaging and take payment. Do not cover this corner with stock before opening. It allows conversation without moving the whole collection. Keep useful materials within reach and protect information or equipment not intended for visitors to handle. Test whether you can wrap an item while another person is still looking at the display, without blocking the rest of the table.
| Area | Main purpose | Possible display | Check |
|---|---|---|---|
| Attention | Introduce the style | One necklace on a bust | Silhouette visible at a distance |
| Earrings | Compare formats | Spaced pairs on supports | Price and sale by the pair |
| Bracelets | See the motifs | Suitable roll or tray | No strain on fastenings |
| Rings | Choose a shape | Uncluttered rows | Size and adjustment explained |
| Service | Try and order | Mirror, tray and packaging | Clean, available surface |
Use height without hiding the jewellery
Place higher supports behind accessible lower ones
On a front-facing table, put the tallest elements at the back and lower supports at the front. Pieces near the edge are then accessible without reaching across a bust. Test the view from a visitor’s position. An arrangement photographed from above can look confusing from the aisle. Check access for different viewing heights and avoid making the most interesting small pieces visible only to someone leaning over the table.
Avoid repeating identical supports in a rigid staircase with no hierarchy. One principal height, a few secondary levels and some open space can structure the composition. Check the shadows cast onto trays. The relief should reveal the jewellery rather than hide part of the collection behind decoration or branding. If a support repeatedly blocks another category, reposition it even if the initial plan looked balanced in a photograph.
Choose backgrounds that reveal details
A plain covering helps people read small pieces. Test gold-tone and silver-tone jewellery against your backgrounds before the event: shiny surfaces sometimes create reflections that erase outlines. Strongly textured fabrics may catch a chain or small clasp. Choose clean, stable materials suited to the handling planned throughout the day. Keep a spare covering or cleaning solution appropriate to the material so a small accident does not disrupt the whole presentation.
Keep decorative accessories proportionate
A plant, card or seasonal object can contribute to the atmosphere, but each occupies useful space. Ask what it gives the visitor: a collection marker, information or decoration alone. Remove anything that obstructs comparison. Materials, supports and spacing can communicate your identity without an accumulation of objects. The jewellery should remain identifiable as the offer, rather than becoming background details in a decorative scene that is difficult to shop.
Six jewellery examples and ways to display them
Show an assembled double strand as one model
The double-strand heart-and-star necklace 52305252 can sit on a simple bust to reveal its two levels and asymmetric drop. Arrange the chains without stretching them. Show a price for this reference and check that visitors do not mistake it for two independent necklaces. Its product page explains the exact composition. Keep nearby jewellery far enough away to avoid the impression that an additional piece belongs to the same assembled model.
Separate a pale pendant from its background
The pearlescent-drop necklace 50980723 is easier to see when the white drop does not disappear against a similarly pale background. Try a gentle contrast and check it under your lighting. Describe the pearlescent appearance accurately without assigning an unannounced natural material. A short label can show the reference, main material and readable price. The background should support the product rather than create a colour impression the item itself does not have.
Keep hoop earrings recognisable as a pair
The small gold-tone ball hoop earrings 10969603-12 should be presented as a pair with enough room to distinguish the beads’ volume. The support must not compress the hinge or make handling awkward. If you intend to demonstrate the fastening, prepare an appropriate sample and explain its operation. Do not promise universal comfort merely because the format is small. Keep the sample and sale stock identifiable within your own organisation.
Provide a size reference for studs
The gold-tone pearl stud earrings 11137538-2 are listed at 1.2 cm. A small specification label distinguishes their volume from a smaller design without turning the stand into a printed catalogue. The white pearl is decorative; do not call it a natural pearl without supporting information. A nearby mirror helps visitors imagine the proportions. Written dimensions remain useful even when a styled image or mirror gives a visual impression.
Explain the adjustment of an open ring
The double twisted-wire ring 11324925-2 can sit in a row of open rings clearly separated from fixed-size models. Explain “adjustable” appropriately: it does not mean every size is possible. Avoid repeatedly deforming a demonstration model. Where a measurement is missing, obtain information before giving a numerical answer. A clear distinction between fixed and adjustable models prevents an attractive display from creating expectations the product specifications do not support.
Make a fine bracelet visible before handling
The fine gold-tone three-rhinestone bracelet 10201217 can sit on a support that separates the three decorative elements visually. Show the chain and extension without pulling the attachments. In an assortment, separate references so you can find the correct price and restock quickly. An overcrowded tray can suggest a bundle even when pieces are sold individually. Check the arrangement after a busy period, when handling may have moved items away from their labels.
Make prices and useful information easy to read
Let visitors understand the offer without interrupting
Choose readable, consistent labels that meet the rules applicable to your sale. Visitors should know which piece each amount refers to. Price groups can help if their boundaries are clear and references are correctly assigned. Recheck labels after reorganising the display: a moved product may end up beside the wrong amount. Make sure decorative cards, ribbons or supports do not hide the information once the stand is viewed from the walkway.
For a bundle, explain its contents and relevant conditions. Do not confuse a pair price with a single-item price. Keep calculations in a separate working file: the customer needs the offer, while you need to check its economics. The different jewellery families in the catalogue can help you prepare a coherent selection. Use current product information and your actual sales conditions when preparing the display, rather than copying an old event’s labels without checking them.
Prepare accurate material information
Record verified specifications instead of broad promises. Stainless steel identifies a material; gold-tone and silver-tone may describe a finish; rhinestones are separate decorative elements. Do not claim an item suits every skin type or every use. If a question exceeds the product information, offer to check rather than improvising a guarantee. Clear answers can remain concise, and a reference list helps you find more detailed information when it is needed.
Use catalogue access as a continuation
A link or scannable code can help people find your shop after the event. Test it on a phone before leaving and check its destination. It should supplement the information on the stand rather than be the only way to discover a price. Plan for poor reception too. A clear card with your business name and shop address remains useful. Ensure that the destination reflects the offer visitors have just seen.
Plan lighting, handling and storage
Check reflections in the actual conditions
Use lighting that reveals shapes without dazzling people facing the stand. Polished surfaces and sparkling details respond differently to the angle. Look from the walkway and then at mirror level. Secure and connect equipment in line with event instructions. Extra lighting is helpful only when it actually improves visibility. Check that a lamp does not create a shadow over a lower tray or obstruct the space reserved for serving customers.
Organise handling carefully
Invite visitors to look or ask for a model according to your setup. A presentation tray avoids placing a chain directly on the table edge. For earrings, establish a trying-on and hygiene procedure appropriate to the product and your conditions of sale. Do not imply that a tried item will be treated exactly like unopened stock without defining your process. Keep the area clean and ensure small fastenings cannot easily roll off the surface.
Review each event
Photograph the stand at the start and record questions, sales and overlooked areas. Distinguish presentation issues from location and audience effects. Change a limited number of elements next time, such as spacing, labels or a product family. Observations are easier to compare than when the whole display changes at every outing. Record practical issues too: a stand that looks attractive but takes too long to restock may need a simpler organisation.
Frequently asked questions about jewellery stands
How many pieces should I display?
It depends on the surface, support sizes and replenishment options. Begin with a selection in which each model remains identifiable and test the view from the walkway. Keep duplicates in labelled boxes. Showing more does not help if references become difficult to distinguish. Leave room to remove and replace a piece without repeatedly disturbing the surrounding display.
Should I group by colour or category?
Either can work. Visitors need to understand the organisation and find models quickly. You can retain main categories and separate finishes or styles within them. Avoid changing the logic without a clear marker halfway along the table, particularly where prices differ. Test whether someone unfamiliar with the collection can locate a category without an explanation.
Can necklaces be displayed directly on the table?
Yes, when the background makes them visible and the chains stay separate. A bust reveals some styles better, whereas a tray helps comparison of smaller pieces. Check tangling risks and access. Do not stretch a chain into position in a way that strains its attachments. Leave room to lift it without catching another model or moving its price label.
Does a small stand need a mirror?
A mirror can help people judge proportions even in a small space. Choose a stable format and a position that does not obstruct the walkway. Keep a clear area for setting down the piece. A mirror complements dimensions and product information rather than replacing an accurate answer about adjustment, fastening or the size range actually available.
How can I tell whether a new layout works better?
Record observations over several comparable events: questions, pieces examined, sales and ease of storage. Footfall and location affect results too. Look for repeated patterns instead of drawing a conclusion from a single day. A successful presentation should be readable for visitors and workable for you throughout the sale, from setup through replenishment to packing everything away.
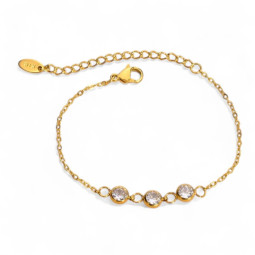
Gold Fine Three Rhinestone Bracelet 10201217
Fine gold-tone stainless steel chain bracelet with three bezel-set round rhinestones. Delicate and bright.
Price €5.04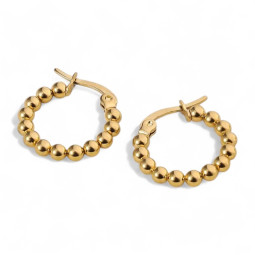
Gold Small Ball Hoop Earrings 10969603-12
Small gold-tone stainless steel hoops made of large, tightly packed beads. A mini size full of relief.
Price €3.00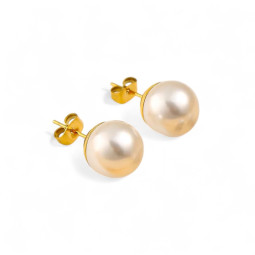
Gold Pearl Stud Earrings 11137538-2
Gold-tone stainless steel stud earrings set with a large round white pearl. Timeless, elegant and easy to wear.
Price €1.68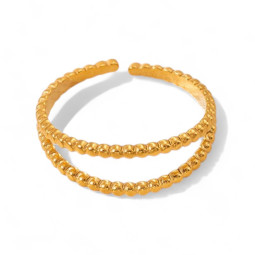
Gold Double Twisted Wire Ring 11324925-2
Slim open gold-tone stainless steel ring made of two parallel twisted bands, set slightly apart.
Price €2.52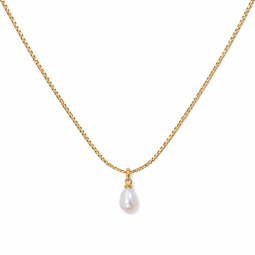
Gold-tone necklace with a pearlescent drop pendant 50980723
A small white pearlescent-look drop finishes this fine gold-tone stainless steel necklace with a lobster clasp and extension chain.
Price €4.68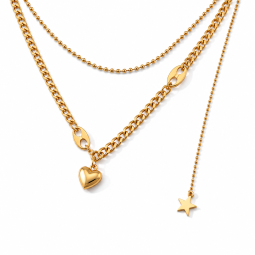

Gold-tone double-layer heart and star necklace 52305252
Two gold-tone chains, a smooth heart and a hanging star create this double-layer stainless steel necklace.
Price €5.28
Leave a comment